vendredi 22 avril 2016

Set up SharePoint 2016 Extranet for your client/provider


One of the first feature that many company need is to provide information to client or provider, one of the way to do that is to open an extranet on which they can connect and find your latest documentation on product, technical documents.

In order to open one site you can add for each users of AD account but it can be expensive if you have many clients. SharePoint offer an other way to authenticate users called FBA (Forms Based Authentication) users and authorization will be stored in a dedicated database.

1. Create the database

From your SharePoint 2016 server go to the folder: "C:\Windows\Microsoft.NET\Framework64\v4.0.30319"

Open and click on "Next/Suivant"
Select the first option and click next again:

Specify the server that will host the datadabse and the named instance if you have any, specify a name for the database "fba_extranet" in my case and click next.
The account use to connect to the SharePoint server will be used as admin for the database you can change the right after.
Click "next/suivant" and the base will be created, you can see the dase and the structure thanks to Management studio:

2. Create Extranet WebApplication

We will now create the SharePoint WebApplication that will host you extranet sites, from SharePoint central administration create a WebApplication

Specify:
- Name
- Port
In claims authentication types chose "Enable Windows Authentication" "NTLM"

Set up you webApplication as you normally do and create it.

2.1 Extend the webApplication

The web application is now available but only your AD users can connect we will now extend the webApplication to make it available through an other url that will be dedicated for your client/provider users.

I've created my webApplication on port 82 my internal users will use that url to connect with SSO to the site using their windows account.

I will now decide that external users will connect on port 8282 but they will use FBA credentials.
Select your webApplication in SharePoint central administration and click on "Extend":
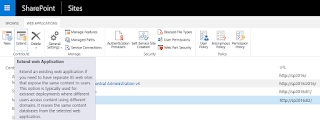
Extend webApplication


Give a name to your extension "Extranet - External users" in my case and a port "8282" for me

Unselect "Enable windows authentication" and select "Enable Forms Based"
Type of name for ASP.Net Membership provider and save it for later do the same for ASP.Net Role Manager:

You can also change the default sign in page if you want to add your company logo or message for your customer but we will not see it here.
Just set up the public Url and chose "Extranet" for the zone:

Please now go to step 2 of this article to see how to tell your SharePoint in which database your users are stored and how to install webParts that will help you manage your users and roles :

Step 2 configuration and install FBA Pack webparts


mardi 29 mars 2016

Use SharePoint icons in design/development


In my previous post we saw how to change default image used by sharepoint into standard masterpage or ribbon for example  (http://larry-microsoft-techno.blogspot.fr/2016/03/change-icons-used-for-sharepoint-2016.html)

In order to map icons to your design I just found this post by Eric :
http://ericoverfield.com/sharepoint-2013-spcommon-png-sprite-breakdown/

Thanks to him you can easily find which css code to use in order to include sharepoint icons into your masterpage or webparts.


vendredi 25 mars 2016

Change icons used for SharePoint 2016 and SharePoint 2016 (spcommon.png and fgimg.jpg)

Designer can easily change icons used for site by modifying the following sprite, one example if you want to have the ribbon in a dark colour the icons "share" "follow" are nearly invisible because they are gray. 
custom spcommon.png 
Once you've changed the image you can use the following css to override the image where they are used : 
img[src*="fgimg.png"]{ 
background-image:url("/_layouts/15/[YOUR-PROJECT]/fgimg-project.png"); 
width:0; 
height:0; 
padding:346.5px 90px; 
}

img[src*="spcommon.png"]{ 
background-image:url("/_layouts/15/[YOUR-PROJECT]/spcommon-project.png"); 
width:0; 
height:0;
padding:134px 135.5px;

mardi 9 février 2016

Install and configure Apps environnement for SharePoint 2016


One new feature that is coming to us from SharePoint 2013 is the Apps Management Service. This awesome new feature allow user to use Apps published on SharePoint Store by the community or by the company IT to enhanced private site for example.

If you want to be able to publish your killer app to the store and maybe make some money with it or if you are ask by your IT to configure the Apps Management Service to offer this feature to user this article is made for you.

There is a few step to achieve in order to enable this service application that will be described below.
First of all if you want to make sure that the service is not yet configured to can navigate to your SharePoint 2016 Central Administration page, section Apps and clic on Purchase Apps.
If the service is not configured or not well configured you will see the following message
This are the steps that we gonna do in order to active Apps Management Service:
  1. Set up a forward lookup zone for apps
  2. Set up the link between the app domain and SharePoint Server 2016
  3. Create applications services:  App Management service
  4. Check the required services on SharePoint Server
  5. Set up the Apps URLs in SharePoint Apps section
  6.  Test apps capabilities.

Set up a forward lookup zone for apps 


SharePoint 2016 need to have urls that are isolated from the Urls of the site where that are used in. In order to do that it’s required to provide an isolation by using a new domain.

It’s highly recommended to not use a subdomain of the domain used by your SharePoint web application.

First of all you have to use a user account that have local administrator right on the domain controller.
1.       From Administrative Tools, click on DNS 
2.       In the DNS Manager window, right-click on Forward Lookup Zones, and click New Zone.
3.       A pop up opened and you will be asked to provide some informations
4.    In the Zone Type page, accept the default of Primary zone, and then click Next.
5.  In the Zone Name page, in the Zone name box type the name for your new app domain name (for example, mcatrinescuApps.com), and then click Next.
6. Click next on the page and review the setting

Set up the link between the app domain and SharePoint Server 2016

We do need to ask the DNS to forward requests from sp.localApps to our SharePoint Server 2016 that will host SharePoint Apps:

1. In the Administrative tools logged as Domain Admin go into the DNS section, in DNS Manager, under Forward Lookup Zones, right-click the new app domain name, and then click New Alias (CNAME).


2. In the New Resource Record dialog box, in the Alias name (uses parent domain if left blank) box, type *
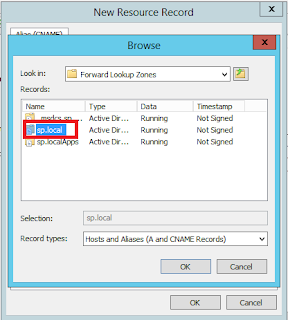
3. To the Fully qualified domain name (FQDN) for target host box, click Browse and navigate to the Forward Lookup Zone for the domain that hosts the SharePoint sites 
4. And then navigate to the record that points to the server that hosts the SharePoint site.


See below the screen well filled, and click OK

Create applications services:  App Management service

1. From SharePoint 2016 administration centrale page click on Manage service application, and add App Management Service service application.


2. Specify the following element in the create form
 - Service application Name
 - Database server
 - Database name
 - Application pool


 3. The service application will be created within a few minutes 

   Check the required services on SharePoint Server

  1. Verify that you are a member of the farm administrators group in Central Administration.
  2. In SharePoint 2016 Central Administration home page, click on Manage services in this farm in the System Settings section
     3. On the Services on Server page, next to App Management Service, verify that the service is well started.

   4. In order to start the "Subscription settings service application" you have to run the following commands other your SharePoint Server 2016. In the first line replace "sp\sp_service" by your managed service account.
         $account = Get-SPManagedAccount sp\sp_service
         $appPool = New-SPServiceApplicationPool -Name SubscriptionServiceAppPool -Account $account         $serviceApp = New-SPSubscriptionSettingsServiceApplication -ApplicationPool              $appPool -name “Subscription Settings Service” -DatabaseName “Subscription_Settings_DB”         $serviceAppProxy = New-SPSubscriptionSettingsServiceApplicationProxy -ServiceApplication $serviceApp
 5. Verify that the service application "Subscription settings service" is well created in the associated page in the central administration page.
6. The service "Microsoft SharePoint Foundation Subscription Settings Service" should also be started in the page "Services on server

Set up the Apps URLs in SharePoint Apps section

From the SharePoint Server 2016 Central Administration page click on Apps and Configure App URLs
1. In the App domain box, type the isolated domain that you just creat for hosting apps url.
2. In App Prefix specify a prefix that will preprend your apps url


Additional set up on Manage web application

The SharePoint Store contains apps for SharePoint intended for use with sites that require Internet-facing endpoints. 

By default, these apps are not available (greyed out and cannot be purchased) because they are incompatible with most sites. However, if your farm is configured to allow internet-facing end points, you can turn on the Internet-facing endpoints feature to show these apps in the SharePoint Store. 

For each web application that will used apps select it from the SharePoint Server 2016 Manage Web Application page


And then activate feature "Apps that require accessible internet facing endpoints"


Test  apps capabilities

From a SharePoint site you can go scroll down setting and click on "Add an app


jeudi 28 janvier 2016

SharePoint 2016 : Log as an other user, add the custom action

Please follow the following step in order to activate the option 'Log as an other user'.

Open the file "welcome.ascx" under the path "C:\Program Files\Common Files\microsoft shared\Web Server Extensions\16\TEMPLATE\CONTROLTEMPLATES"

Add the following lines after the element « ID_RequestAccess » :

<SharePoint:MenuItemTemplate runat="server" ID="ID_LoginAsDifferentUser"
Text="<%$Resources:wss,personalactions_loginasdifferentuser%>"
 Description="<%$Resources:wss,personalactions_loginasdifferentuserdescription%>"
 MenuGroupId="100"
 Sequence="100"
 UseShortId="true"
 />


And see the result:

Before:

After:

mardi 26 janvier 2016

SharePoint 2016 installation de OneDrive for Business

OneDrive for Business fait partie du service de Profil utilisateur depuis SharePoint 2013 et permet de proposer un espace de stockage des documents/vidéos pour tous les utilisateurs de SharePoint.

Sur SharePoint 2016 cette fonctionnalité est améliorée notamment via le service de synchronisation hors ligne des documents ainsi que la taille maximale des fichiers qui est désormais de 4Go.

Sur une machine avec SharePoint 2016 RC nous allons maintenant voir comment installer cette fonctionnalité.

1. Création d'une application Web.

Depuis la page d'accueil de l'administration centrale de SharePoint 2016 cliquez sur "Manage web applications"


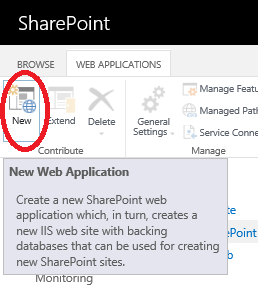
Cliquez ensuite sur New dans le coin supérieur gauche

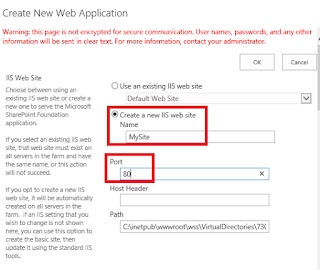
-Spécifier le nom du site IIS, le port sur lequel se trouvera l'application
 

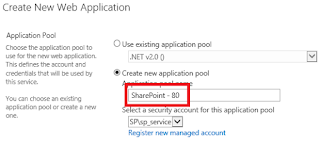
Dans la partie Application pool, saisir un nom pour le pool d'application ainsi que le compte de service en charge de l'éxécuter.


Enfin cliquez sur "Ok" pour créer l'application Web.

2.Création d'une collection de sites de type "MySite"

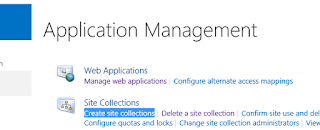
Depuis la page d'accueil de l'administration centrale cliquez sur "Create site collections"


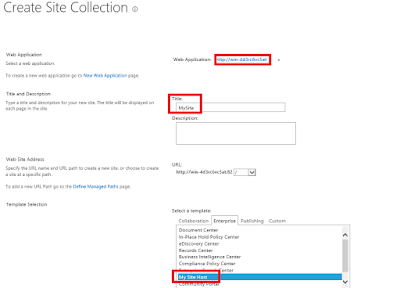
Sélectionnez l'application web nouvellement ajoutée:
- Saisir un nom pour la collection de sites
- Attention à sélectionnez "My Site Host" dans la liste des templates de collection de sites.
 
-Selectionnez les administrateurs de sites puis cliquez sur "Ok".

Une fois la collection de site de type "Mysite" créée naviguer vers le site pour voir s'afficher la page d'accueil de votre service OneDrive for Business :


3.Création du service de Profil Utilisateur.

Maintenant que la collection de sites "MySite" existe il faut créer l'application de service de Profil Utilisateur pour permettre aux utilisateurs SharePoint d'avoir un site dédié.

Depuis la page d'accueil de l'administration centrale de SharePoint 2016 cliquez sur "Manage Service applications"

Dans la barre d'ajout sélectionner l'élément "User Profile Service Application"

Remplir le formulaire en spécifiant:
- Le nom de l'application de service 
- Le nom du Pool d'application
- Le compte de service à utiliser pour le pool d'application
- Spécifier l'url de l'application web à la racine de laquelle se trouve votre collection de sites de type "MySite" 

-Spécifier le chemin d'accès géré sous lequel les sites par utilisateurs seront ajoutés
- Le format des noms de site avec résolution des conflits le cas échéant
- Choisir si vous désirez utiliser Yammer ou les fonctionnalités de RSE de SharePoint (Yammer nécéssite un abonnement supplémentaire pour être utilisé)

Enfin cliquez sur "Ok" pour créer l'application de service.


4. Votre site OneDrive for Business

Rendez vous sur le site racine de la collection de site "MySite"  puis cliquez sur "Next" pour afficher votre site personnel.
Après quelques minutes votre site personnel s'affiche:


Remarquez alors que l'url de votre site contient votre nom utilisateur (ainsi que le nom de l'AD selon l'option choisie lors de la création de la collection de sites):
Il est alors possible de synchroniser vos documents pour travailler hors ligne et garder vos données à jour.

Il est également très simple de partager un document:
Le partage se fait alors facilement au sein de votre organisation: