One new
feature that is coming to us from SharePoint 2013 is the Apps Management
Service. This awesome new feature allow user to use Apps published on
SharePoint Store by the community or by the company IT to enhanced private site
for example.
If you want
to be able to publish your killer app to the store and maybe make some money
with it or if you are ask by your IT to configure the Apps Management Service
to offer this feature to user this article is made for you.
There is a
few step to achieve in order to enable this service application that will be
described below.
First of
all if you want to make sure that the service is not yet configured to can
navigate to your SharePoint 2016 Central Administration page, section Apps and clic on Purchase Apps.
If
the service is not configured or not well configured you will see the following
message
This are
the steps that we gonna do in order to active Apps Management Service:
- Set up a forward lookup zone for apps
- Set up the link between the app domain and SharePoint Server 2016
- Create applications services: App Management service
- Check the required services on SharePoint Server
- Set up the Apps URLs in SharePoint Apps section
- Test apps capabilities.
Set up a forward lookup
zone for apps
SharePoint
2016 need to have urls that are isolated from the Urls of the site where that
are used in. In order to do that it’s required to provide an isolation by using
a new domain.
It’s highly
recommended to not use a subdomain of the domain used by your SharePoint web
application.
First of
all you have to use a user account that have local administrator right on the
domain controller.
1. From Administrative Tools, click on DNS
2. In the DNS Manager window, right-click on Forward Lookup Zones, and click New Zone.
3. A pop up opened and you will be
asked to provide some informations
4. In the Zone Type page, accept the default of Primary zone, and then click Next.
5. In the Zone Name page, in the Zone name box type the name for your new app domain name (for example, mcatrinescuApps.com), and then click Next.
6. Click next on the page and review the setting
Set up the link between the app domain and SharePoint Server 2016
We do need to ask the DNS to forward requests from sp.localApps to our SharePoint Server 2016 that will host SharePoint Apps:
1. In the Administrative tools logged as Domain Admin go into the DNS section, in DNS Manager, under Forward Lookup Zones, right-click the new app domain name, and then click New Alias (CNAME).
2. In the New Resource Record dialog box, in the Alias name (uses parent domain if left blank) box, type *.
3. To the Fully qualified domain name (FQDN) for target host box, click Browse and navigate to the Forward Lookup Zone for the domain that hosts the SharePoint sites
4. And then navigate to the record that points to the server that hosts the SharePoint site.
See below the screen well filled, and click OK
Create applications services: App Management service
1. From SharePoint 2016 administration centrale page click on Manage service application, and add App Management Service service application.
2. Specify the following element in the create form
- Service application Name
- Database server
- Database name
- Application pool
3. The service application will be created within a few minutes
Check the required services on SharePoint Server
- Verify that you are a member of the farm administrators group in Central Administration.
- In SharePoint 2016 Central Administration home page, click on Manage services in this farm in the System Settings section
3. On the Services on Server page, next to App Management Service, verify that the service is well started.
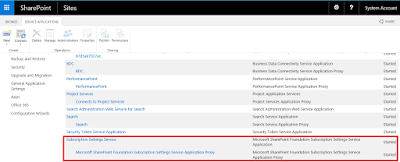
4. In order to start the "Subscription settings service application" you have to run the following commands other your SharePoint Server 2016. In the first line replace "sp\sp_service" by your managed service account.
$account = Get-SPManagedAccount sp\sp_service
$appPool
= New-SPServiceApplicationPool -Name SubscriptionServiceAppPool -Account
$account $serviceApp
= New-SPSubscriptionSettingsServiceApplication -ApplicationPool $appPool -name “Subscription
Settings Service” -DatabaseName “Subscription_Settings_DB” $serviceAppProxy =
New-SPSubscriptionSettingsServiceApplicationProxy -ServiceApplication
$serviceApp
5. Verify that the service application "Subscription settings service" is well created in the associated page in the central administration page.
6. The service "Microsoft SharePoint Foundation Subscription Settings Service" should also be started in the page "Services on server" 

Set up the Apps URLs in SharePoint Apps section
From the SharePoint Server 2016 Central Administration page click on Apps and Configure App URLs
1. In the App domain box, type the isolated domain that you just creat for hosting apps url.
2. In App Prefix specify a prefix that will preprend your apps url
Additional set up on Manage web application
The SharePoint Store contains apps for SharePoint intended for use with sites that require Internet-facing endpoints.By default, these apps are not available (greyed out and cannot be purchased) because they are incompatible with most sites. However, if your farm is configured to allow internet-facing end points, you can turn on the Internet-facing endpoints feature to show these apps in the SharePoint Store.
For each web application that will used apps select it from the SharePoint Server 2016 Manage Web Application page

And then activate feature "Apps that require accessible internet facing endpoints"

Test apps capabilities
From a SharePoint site you can go scroll down setting and click on "Add an app"


