Due to the fact that sharepoint 2016 use claim authentication organizational browser doesn't work anymore.
In order to fix this issue simply add the following script into the page just after your webpart:
<script type="text/javascript">
function CreateHierarchyChartControl(parentId, profileId, type, persistControlId, flowDirection, silverLightControlId)
{
var i = profileId.indexOf("|");
var claimsmode = profileId.substr(i-1,1);
if((i >=0 ) & (claimsmode=="w"))
{
profileId = profileId.substr(i+1,profileId.length-i-1);
//var initParam = profileId + ',' + type + ',' + persistControlId;
var initParam = profileId + ',' + type + ',' + persistControlId + ',' + flowDirection + ',' + silverLightControlId;
var host = document.getElementById(parentId);
host.setAttribute('width', '100%');
host.setAttribute('height', '100%');
Silverlight.createObject('/_layouts/ClientBin/hierarchychart.xap',
host,'ProfileBrowserSilverlightControl',
{
top: '30',
width: '100%',
height: '100%',
version: '2.0',
isWindowless: 'true',
enableHtmlAccess: 'true'
},
{
onLoad: OnHierarchyChartLoaded
}, initParam, null);
}
}
</script>
vendredi 16 septembre 2016
samedi 30 avril 2016
House Ads: Télécommande LiveBox pour windows 10 / windows phone 10
Déjà plus de 100 téléchargements pour mon application sur le Windows Store !!
L'application est disponible sur tablette et PC avec Windows 10 ainsi que les nouveaux Windows Phone 10
https://www.microsoft.com/store/apps/9nblggh4p1cb
L'application est uniquement disponible pour le marché Français.
L'application permet de télécommander votre LiveBox, l'application se veut simple et sans fonctionnalités superflus.

vendredi 22 avril 2016
Set up SharePoint 2016 Extranet for your client/provider part 2, set up web.config and install FBA pack
Please see step 1 if you missed it on how to create membership database, create webApplication for your Extranet site and how to extend it : http://larry-microsoft-techno.blogspot.fr/2016/04/set-up-sharepoint-2016-extranet-for.html
1. Configure web.config
We will now tell SharePoint that membership provider and the role provider are stored into the database we create in the first step.
save a copy of that file and edit the original one:

In the section "Connectionstrings" add :
<add connectionString="Server=SP2016; Database=fba_extranet; Integrated Security=true" name="SQLConn" />
Replace "SP2016" and "fba_extranet" by your SQL server instance and the database name you create earlier:
Into "<membership><providers>" add the following lines, replace "SQL_Membership" by the membership provider name you chose earlier when we have extended the webApplication. You can see that you can change some parameters (password length, max invalid password attempts before account will be locked etc..):
<add name="SQL_Membership"

Into "<roleManager><providers>" add the following lines, replace "SQL_Role" by the membership provider name:
<add name="SQL_Role" connectionStringName="SQLConn" applicationName="/"
type="System.Web.Security.SqlRoleProvider, System.Web, Version=4.0.0.0, Culture=neutral, PublicKeyToken=b03f5f7f11d50a3a" />

Save the file (if you have problem saving the file open notepad with admin right).
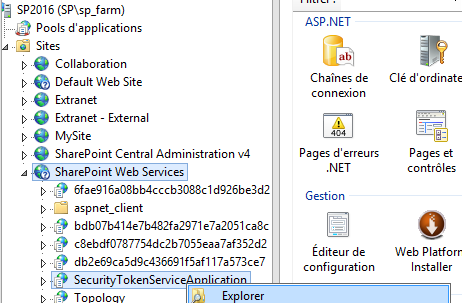
2. Edit Security Token Service Application
Go to IIS manager, go into "SharePoint Web Services" right click on "SecurityTokenServiceApplication" and clic "Explore":
Modify web.config file add the membership and role like you did into machine.config file add the following line under <configuration>
<!-- Section to add -->
<system.web>
<membership>
<providers>
<!-- Add membership provider here -->
</providers>
</membership>
<roleManager enabled="true">
<providers>
<!-- Add role provider here -->
</provider>
</roleManager>
<customErrors mode="RemoteOnly"/>
</system.web>
<!-- End Section to add -->

3. Install FBA Pack solution
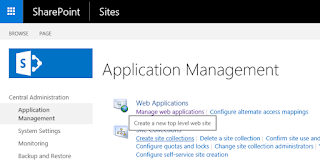
We can now create our first site collection in the web application go to "Application Management => Create site collection"
Select the webApplication Extranet and create a team site for example
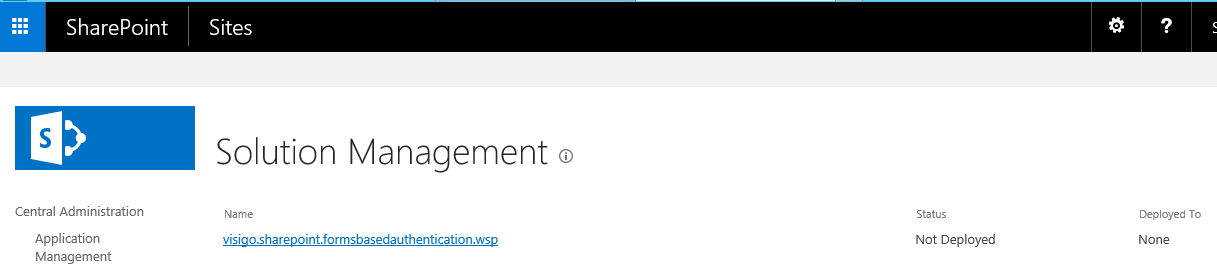
Download the zip from https://sharepoint2013fba.codeplex.com/ and extract the archive on the SharePoint 2016 server, add the solution thanks to powershell with the Add-SPSolution.
Navigate to the farm solutions management page and deploy the solution to your WebApplication:


Select the webApplication Extranet and create a team site for example
Download the zip from https://sharepoint2013fba.codeplex.com/ and extract the archive on the SharePoint 2016 server, add the solution thanks to powershell with the Add-SPSolution.
Navigate to the farm solutions management page and deploy the solution to your WebApplication:
Set up SharePoint 2016 Extranet for your client/provider
One of the first feature that many company need is to provide information to client or provider, one of the way to do that is to open an extranet on which they can connect and find your latest documentation on product, technical documents.
In order to open one site you can add for each users of AD account but it can be expensive if you have many clients. SharePoint offer an other way to authenticate users called FBA (Forms Based Authentication) users and authorization will be stored in a dedicated database.
1. Create the database
From your SharePoint 2016 server go to the folder: "C:\Windows\Microsoft.NET\Framework64\v4.0.30319"

Open and click on "Next/Suivant"

Select the first option and click next again:

Specify the server that will host the datadabse and the named instance if you have any, specify a name for the database "fba_extranet" in my case and click next.
The account use to connect to the SharePoint server will be used as admin for the database you can change the right after.

Click "next/suivant" and the base will be created, you can see the dase and the structure thanks to Management studio:

2. Create Extranet WebApplication
We will now create the SharePoint WebApplication that will host you extranet sites, from SharePoint central administration create a WebApplication

Specify:
- Name
- Port
In claims authentication types chose "Enable Windows Authentication" "NTLM"
Set up you webApplication as you normally do and create it.
2.1 Extend the webApplication
The web application is now available but only your AD users can connect we will now extend the webApplication to make it available through an other url that will be dedicated for your client/provider users.
I've created my webApplication on port 82 my internal users will use that url to connect with SSO to the site using their windows account.
I will now decide that external users will connect on port 8282 but they will use FBA credentials.
Select your webApplication in SharePoint central administration and click on "Extend":
 |
| Extend webApplication
Give a name to your extension "Extranet - External users" in my case and a port "8282" for me

Unselect "Enable windows authentication" and select "Enable Forms Based"
Type of name for ASP.Net Membership provider and save it for later do the same for ASP.Net Role Manager:

You can also change the default sign in page if you want to add your company logo or message for your customer but we will not see it here.
Just set up the public Url and chose "Extranet" for the zone:

Please now go to step 2 of this article to see how to tell your SharePoint in which database your users are stored and how to install webParts that will help you manage your users and roles :
Step 2 configuration and install FBA Pack webparts |
mardi 29 mars 2016
Use SharePoint icons in design/development
In my previous post we saw how to change default image used by sharepoint into standard masterpage or ribbon for example (http://larry-microsoft-techno.blogspot.fr/2016/03/change-icons-used-for-sharepoint-2016.html)
In order to map icons to your design I just found this post by Eric :
http://ericoverfield.com/sharepoint-2013-spcommon-png-sprite-breakdown/
Thanks to him you can easily find which css code to use in order to include sharepoint icons into your masterpage or webparts.
vendredi 25 mars 2016
Change icons used for SharePoint 2016 and SharePoint 2016 (spcommon.png and fgimg.jpg)
Designer can easily change icons used for site by modifying the following sprite, one example if you want to have the ribbon in a dark colour the icons "share" "follow" are nearly invisible because they are gray.

Once you've changed the image you can use the following css to override the image where they are used :
img[src*="fgimg.png"]{
background-image:url("/_layouts/15/[YOUR-PROJECT]/fgimg-project.png");
width:0;
height:0;
padding:346.5px 90px;
}
background-image:url("/_layouts/15/[YOUR-PROJECT]/fgimg-project.png");
width:0;
height:0;
padding:346.5px 90px;
}
img[src*="spcommon.png"]{
background-image:url("/_layouts/15/[YOUR-PROJECT]/spcommon-project.png");
width:0;
height:0;
padding:134px 135.5px;
}
Inscription à :
Articles
(
Atom
)